How to Add Staff
Add team members with the staff setup wizard, assign reusable roles, review invitations, and update existing staff together.
How to Add Staff
Add a staff member, assign a reusable role, and review their profile, availability, services, and pay rates before inviting them.
Before You Begin
- Sign in at https://app.joinzipper.com/auth/login with permission to Manage Org Staff.
- Have the staff member’s Email, First name, and Last name ready.
- Schedule, pay rate, and private staff details may require additional permissions. Some controls within those setup sections are restricted by your permissions.
Add a Staff Member
Step 1: Open the Staff Setup Wizard
- Go to Staff > Staff Members. Your organization’s staff wording may differ.
- Click Add staff member.
Step 2: Set Up the Account and Role
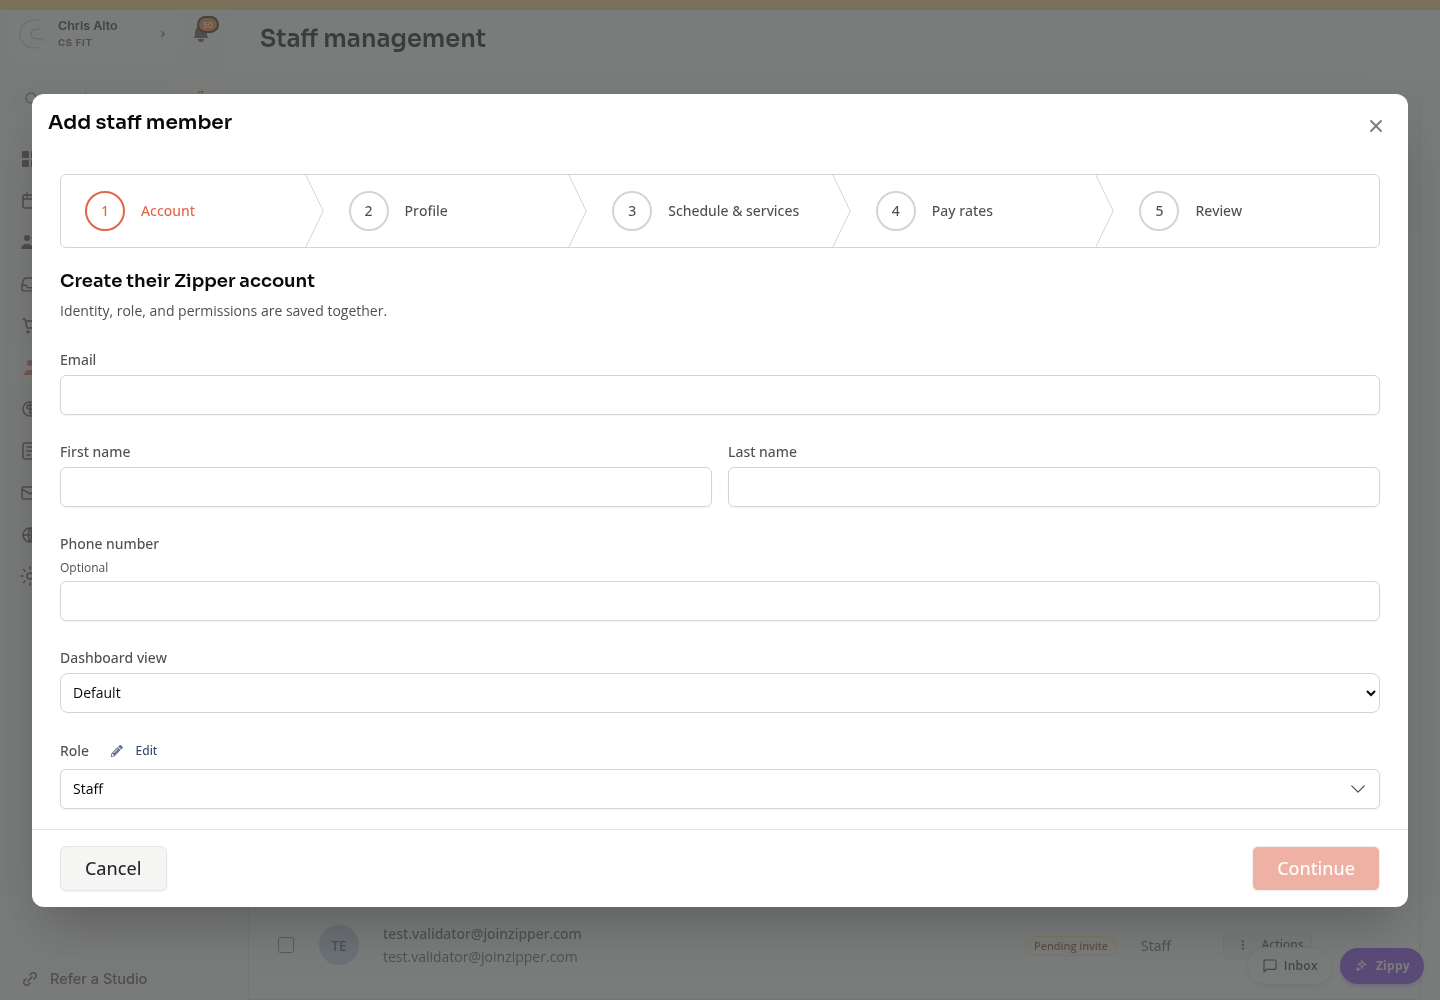
- In Account, enter Email, First name, and Last name. Phone number is optional.
- Review Dashboard view and choose the appropriate view.
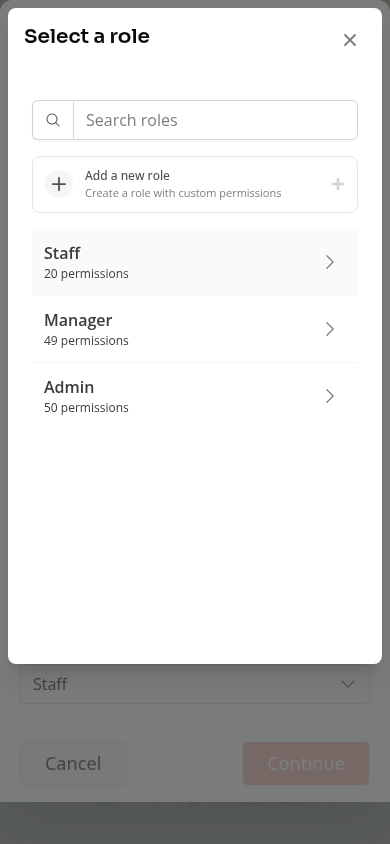
- Open Role and choose one of your organization’s saved roles. The picker shows the role’s name and permission count.
- Click Continue.
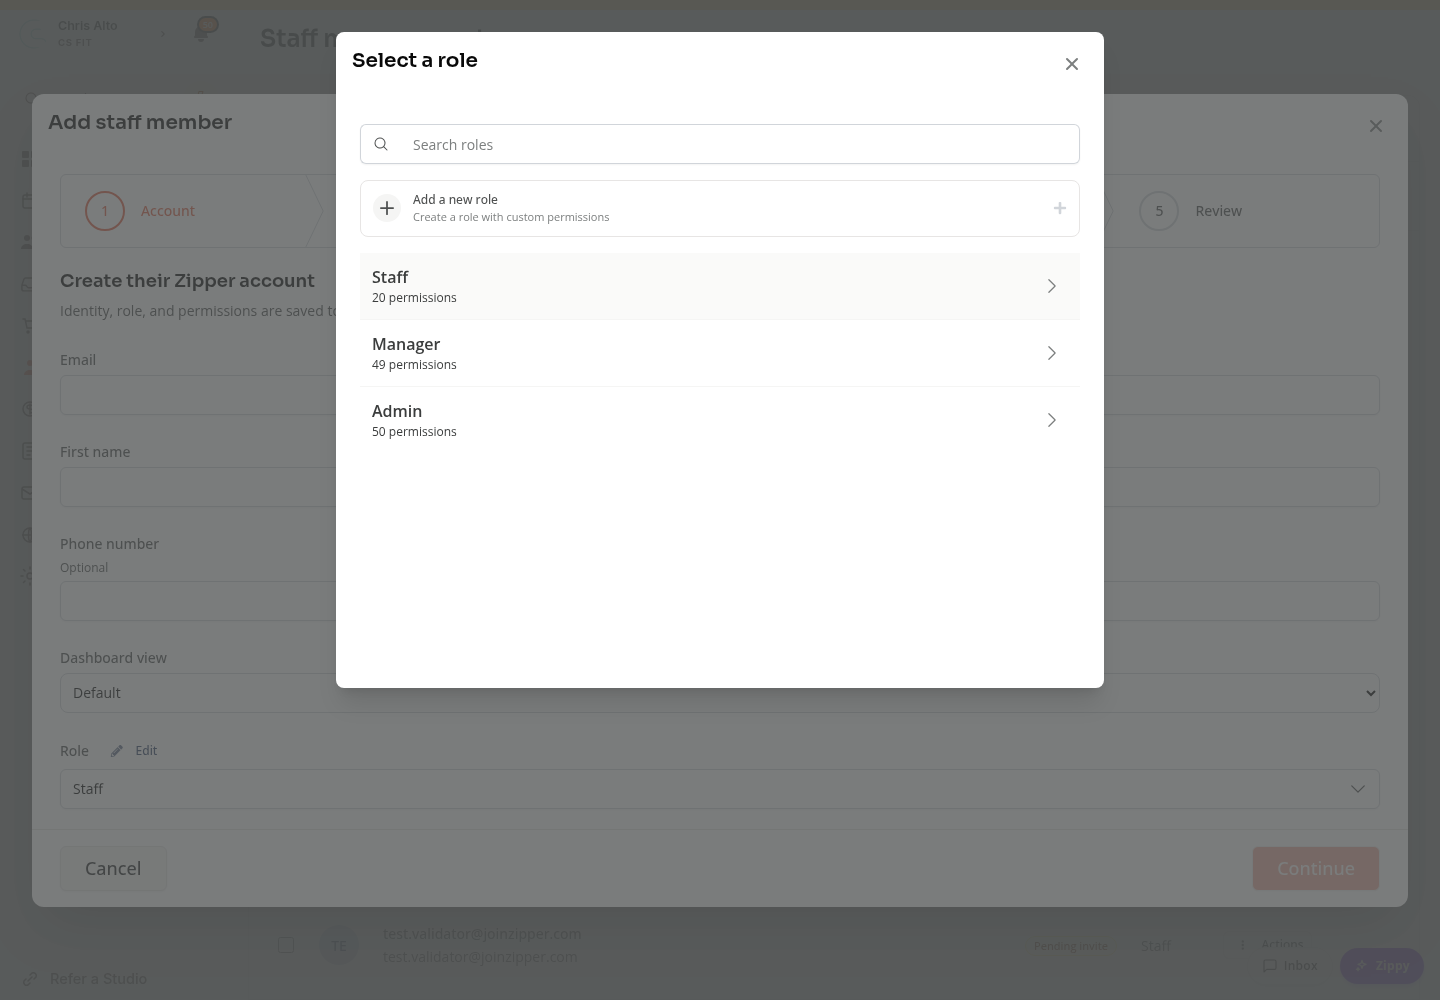
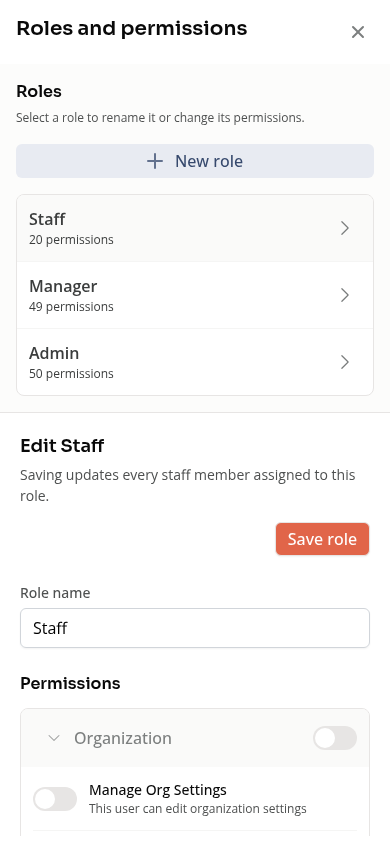
To create a reusable role from this picker, choose Add a new role. To edit the selected role, use Edit beside Role. Review the role’s permissions carefully: saving a role updates every staff member assigned to it.
Step 3: Review Profile, Services, and Pay Rates
Move through Profile, Schedule & services, and Pay rates using Continue.
- Add the profile information you want to display, such as a photo and public biography.
- If the person provides appointments, configure availability schedules and appointment services as needed. An availability schedule is required before assigning appointment services.
- Assign pay rates if you have access to manage them. You can also update the staff setup later.
Step 4: Review and Create
- In Review, check the account, profile, schedules, service assignments, and pay rates.
- Choose whether to enable Send invitation email after setup saves.
- Click Review setup to load the preview and review any warnings.
- Click Create staff member when the setup is correct.
- Review Staff setup complete and the invitation result, then click Done.
An invitation failure does not roll back the saved staff member. Use the pending invite controls to resend the email rather than creating the person again.
Reusable Roles and Permissions
Your organization starts with Admin, Manager, and Staff roles and can rename roles or create additional roles. Access depends on the saved permissions, so a role name alone is not a complete description of what someone can do.
Admin roles always have every organization permission. The default Manager role starts with all permissions except staff management; customizations can change a non-admin role’s permissions.
Change a Staff Member’s Role
- Go to Staff > Staff Members and choose Edit for the person.
- In Account, choose the desired Role.
- Click Save changes.
Create or Edit a Role
- From the staff list, click Edit roles and permissions.
- Select an existing role, or click New role.
- Enter or update Role name and review the Permissions groups.
- Turn editable permissions on or off. Some permissions are fixed, and Admin role permissions cannot be turned off.
- Click Save role for an existing role or Create role for a new role.
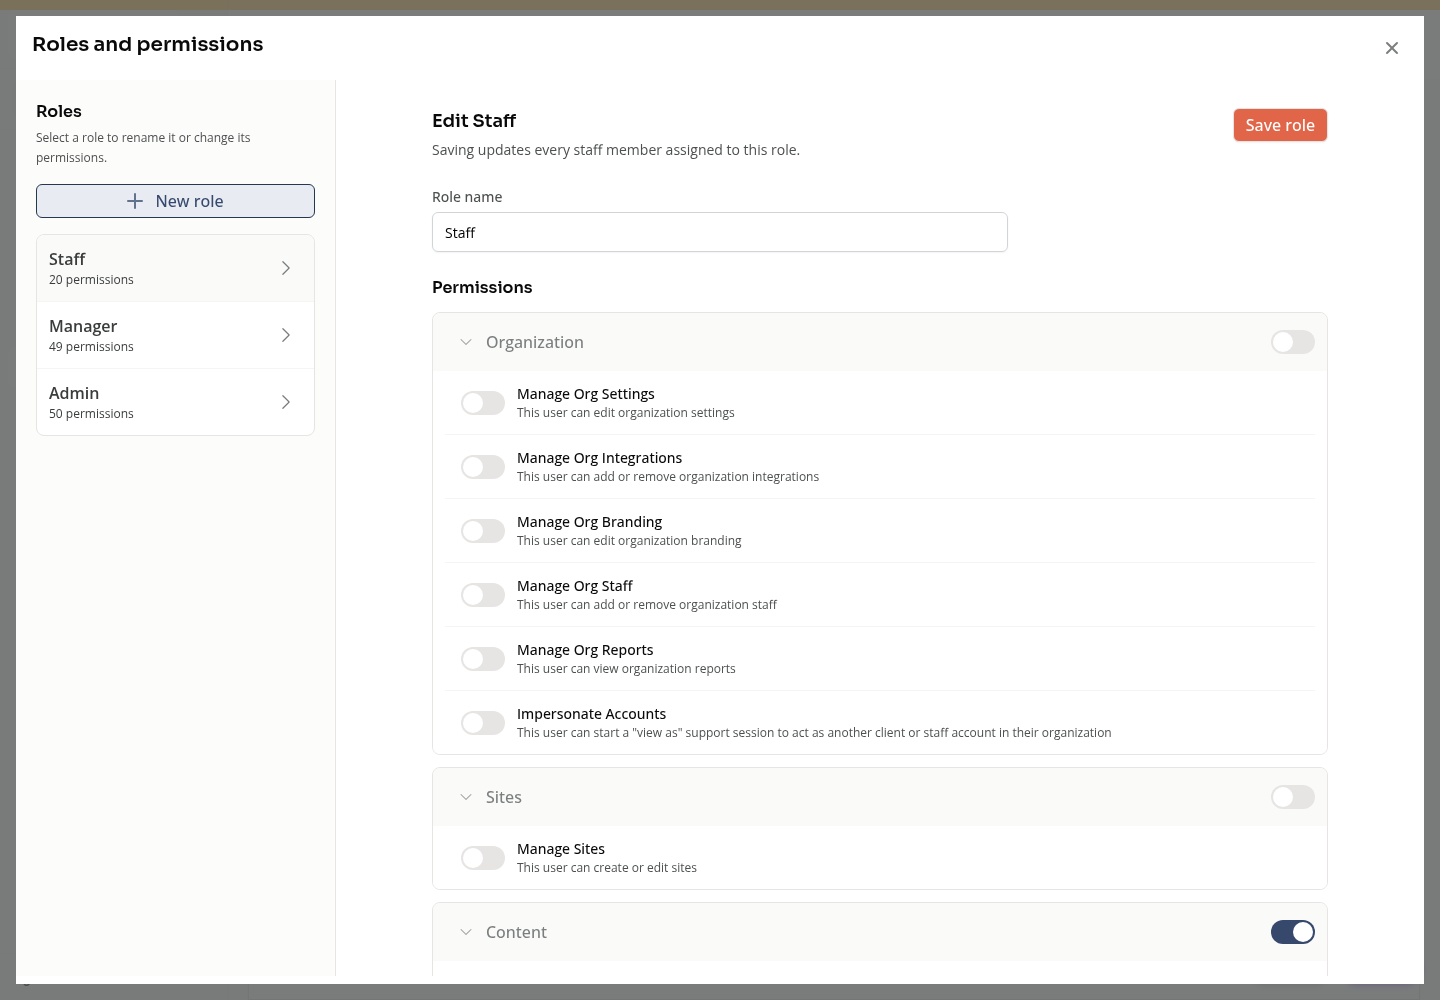
Saving an existing role changes access for everyone assigned to that role. To give one person different access, create an appropriate separate role and assign it to that person.
Useful Permission Labels
The editor displays readable permission names and descriptions. For example:
| Permission | What it unlocks |
|---|---|
| View Customers | View the customer list |
| Manage Customers | Manage customer profiles |
| View Customer Financials | View customer billing and payment history |
| Manage Point Of Sale | Access Point-of-Sale |
| View Payment Collector | View and access the payment collector |
| View Substitution Board | View substitution requests |
| Claim Substitutions | Offer to claim substitutions |
| Post Substitution Board | Post substitution requests and comments |
| Manage Own Time Tracking | Manage personal time tracking |
| View Org Financials | View organization financial data, including pay rates, reports, and payouts |
Use the descriptions in your organization’s permission editor to confirm the access you are granting.
What the Staff Member Receives
When the invitation is sent, the staff member receives an email for joining your organization. They should follow its link to complete account setup or sign in with their existing account using the invited email address.
If they have forgotten their password, use the password reset flow on the login page.
Managing Staff After Adding
The staff list supports editing, cloning setup, deactivation, and invitation management. Pending invite filters the list to people who have not completed their invitation. Eligible Admin or Manager users see Resend invite for a pending invitation.
Update Several Existing Staff Members
- Select the staff members you want to update and click Edit selected.
- Choose a role change, shared appointment types to add, or both.
- If adding shared types, choose the availability schedules that should receive them.
- Review the changes, then click Save changes.
- Check the result for each staff member. Successful updates remain saved if another person’s update fails; failed people remain selected for follow-up.
This edits existing staff. Add new staff through Add staff member.
On Mobile
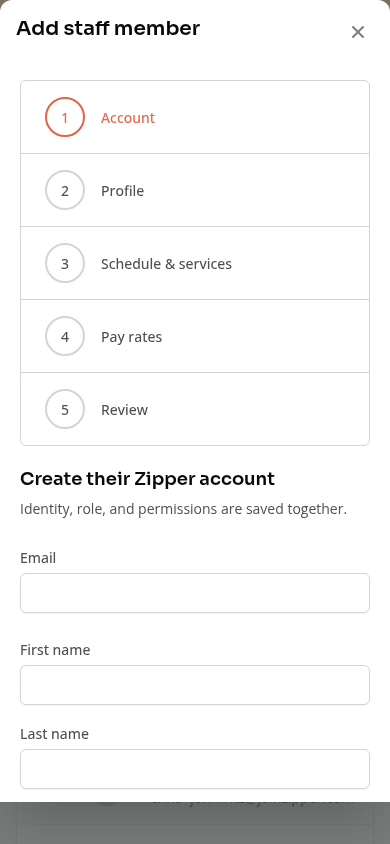
The same staff setup opens in a mobile layout. Scroll within the form to reach account fields, role choices, and later setup sections. The role editor also shows the warning that saving changes everyone assigned to the role.
Troubleshooting
No Add staff member button? Check that your role has Manage Org Staff permission. The role’s saved permissions control staff management; the role name alone does not determine access.
Staff member didn’t receive the invitation? Check their email address and spam folder. Review the invitation result and Pending invite filter. If available for your account, use Resend invite from the staff list.
Staff member can’t log in after accepting? Verify they’re using the email address the invitation was sent to.
Staff member can’t see a feature after a role change? Have them refresh their browser, then check the assigned role and its saved permissions. Confirm that you edited the intended role, since role edits affect everyone assigned to it.
Can’t turn a permission off? Some permissions are fixed. Admin roles always retain all organization permissions.
Need a hand?
Email our team at support@joinzipper.com and we'll usually reply within a few hours.
Was this article helpful?
Thanks for your feedback.